Logo

BF225 - Tips for removing propshaft holder?

brettmarl

Regular Contributor
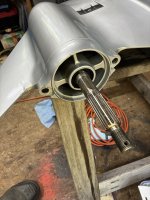
Trying to dig into my lower unit to replace drive shaft bearing. Gear shaft already removed and it’s in fwd gear per the removal procedure.

Procedure on 17-19 says to remove the two big bolts then pry the propshaft unit out with screwdriver using the two opposing slots.

I’ve broken the tip on two huge screwdrivers. Not moving. Tried to rotate / break free by hitting on ears but nothing. Tried heat and PB blaster and not budging.

Any tips for getting this out?

Honda 225 video on YT makes it look super trivial pry and wiggle like stated in the manual.

I’ve been some Yamaha examples where they attach slide hammer to threaded propshaft but that seems like it would be a bad idea and put a lot of force on bearing stack.

At my wits end.
 

Attachments

  • IMG_5094.jpeg
    IMG_5094.jpeg
    140.7 KB · Views: 10
Your hesitation is just nature's way of expressing how WISE you really are!

Care and patience are the two things that will work in your favor to prevent breakage and financial tragedy.

It sounds as if corrosion has a firm grip on the holder and forcing it is likely to only end with a cracked, broken case. It's true those two bolts hold the assembly in the case and once they're removed it should just slide out with very gentle coaxing. But not always!

There's some stuff called "Aero Kroil" that's known as "the oil that creeps"...and it DOES! I have used it for years and have seen how it works it's way in through rust and corrosion over long distances. But...
....it's a slooow process.

If you're in a big hurry it won't work. I have learned to let it sit and do it's thing.

Using light heat, as from a heat gun, can speed things up a bit and get it moving but I've waited weeks for it to help me save something I cherish or can't get another copy of. "Made of unobtanium" as the saying goes.

And that saying describes my finances when buying some Honda parts.

Using Aero Kroil, a bit of heat and yes, some very careful tapping with a slide hammer, every day or so, will eventually get it moving but probably not as fast as you want.

Good luck.
 
The old cars guys use a 50/50 mix of automatic transmission fluid and acetone to unstick seized pistons. Use the pink transmission fluid, say dextron, and soak the unit in a container for a couple of days. Use this and follow jgmo’s advice on tapping etc.
 
The old cars guys use a 50/50 mix of automatic transmission fluid and acetone to unstick seized pistons. Use the pink transmission fluid, say dextron, and soak the unit in a container for a couple of days. Use this and follow jgmo’s advice on tapping etc.
won't acetone kill my paint?
 
Your hesitation is just nature's way of expressing how WISE you really are!

Care and patience are the two things that will work in your favor to prevent breakage and financial tragedy.

It sounds as if corrosion has a firm grip on the holder and forcing it is likely to only end with a cracked, broken case. It's true those two bolts hold the assembly in the case and once they're removed it should just slide out with very gentle coaxing. But not always!

There's some stuff called "Aero Kroil" that's known as "the oil that creeps"...and it DOES! I have used it for years and have seen how it works it's way in through rust and corrosion over long distances. But...
....it's a slooow process.

If you're in a big hurry it won't work. I have learned to let it sit and do it's thing.

Using light heat, as from a heat gun, can speed things up a bit and get it moving but I've waited weeks for it to help me save something I cherish or can't get another copy of. "Made of unobtanium" as the saying goes.

And that saying describes my finances when buying some Honda parts.

Using Aero Kroil, a bit of heat and yes, some very careful tapping with a slide hammer, every day or so, will eventually get it moving but probably not as fast as you want.

Good luck.
will try Aero Kroil. not in a mega rush - local honda shop is backed up and can't look at it for a few months - figured i could probably do it myself sooner....

my efforts with the heat gun were pretty weak - the case is such a huge heatsink that any heat dissipates very quickly. didn't want to propane-torch it - as don't want to wreck the paint.
 
I have no idea if acetone will affect paint, when mixed with oil, I’ve only used it in unpainted situations. Msds on both acetone and aerokroil shows a lot of volatile chemicals. Try the acetone/oil as a last resort but I’m thinking if you are patient, it will come apart. The aluminum builds up a lot of white powder rust that tightens things up.

On rusted bolts, those induction tools are great for heating without damage to paint or the open flame of a torch, very fast and good in tight spaces. Probably not useful in this circumstance.
 
I'll try boiling water - but that probably won't be hot enough - feel like I got it into that range with electric heat gun. Maybe I need to torch it and repaint when I'm done.

Trying to figure out if there is some way to put a puller on those tabs to get an even pull on them, but a jaw-puller tool like this won't work as the prop-shaft and the housing will move together.

Another idea would to re-insert the housing bolts part-way so I have something to push against that is part of the main case (head of bolt) and try and create pull-force between the tab and bolt-head. Can't figure out what tool would work as there is a bit of an offset involved.

Or fallback to the slide-hammer on the prop shaft ...

1780239959080.png
 
I also use a block of hardwood on things like this on the area of the joint and tap it around the circumference, it can shock the locked joint and the wood won’t damage the metal.
 
Well … it’s out. Not without sacrifice.

Nothing would move this thing. Ended up deciding to accept repaint and so started hitting it hard with propane torch to get case nice and hot. Even then nothing would move. Started air hammering on the tabs assuming I’m sacrificing my bearing carrier at this point but hopefully case save the case. Carrier not too $$ to replace but obviously rebuilding it will be a project.

Eventually it started to separate a fraction of a mm. Multiple overnight soaks and then could start getting a putty knife blade between tabs and slowing teasing it out with a massive amount of hammering and wedging.

Then my carrier ears sheared off - so that that point I’m committed and start air hammering on the exposed lip of the carrier. Even once I got that cleared it would not move at all. Took a lot more heating and air hammering to break the seal / corrosion at the deep oring. That the pen fluid never got anywhere near.

In hindsight now that I see how this goes together what probably would have worked is to flood the cavity behind the water pump with acetone/deisel blend. That goes down to the center of the bearing carrier and would have reached the stuck oring.

Oh well … live and learn. Hopefully someone learns from my error.

IMG_5114.jpeg
 
Drive shaft is out. Snapping that pinion nut free was also a bear. Could not move it with an impact. Had to build a jig to pin case to the floor, keep shaft straight and use a 36” breaker bar on the spline adapter.

Now I need to clean my shop so I can put it all back together in a clean-room environment 😂


IMG_5125.jpeg
 
Back
Top