Logo

2010 Mercury 30 HP EFI – Intermittent Fuel Pump Connection at VST

I have a 2010 Mercury 30 HP EFI four-stroke outboard, serial number 0R316300.

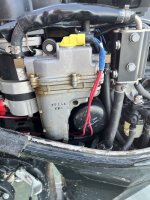
The high-pressure fuel pump inside the vapor separator tank (VST) works intermittently. I've traced the problem to the electrical connection on top of the VST.

The black wiring harness connector snaps securely into a yellow plastic connector mounted in the aluminum VST housing. The contacts appear clean.

If I press downward on the connector, the pump runs. If I release pressure, it stops. I can produce the same result by pressing directly on the yellow plastic piece, without any apparent movement between the black and yellow connectors.

The yellow piece itself moves slightly relative to the aluminum housing. When the pump runs, the engine starts.

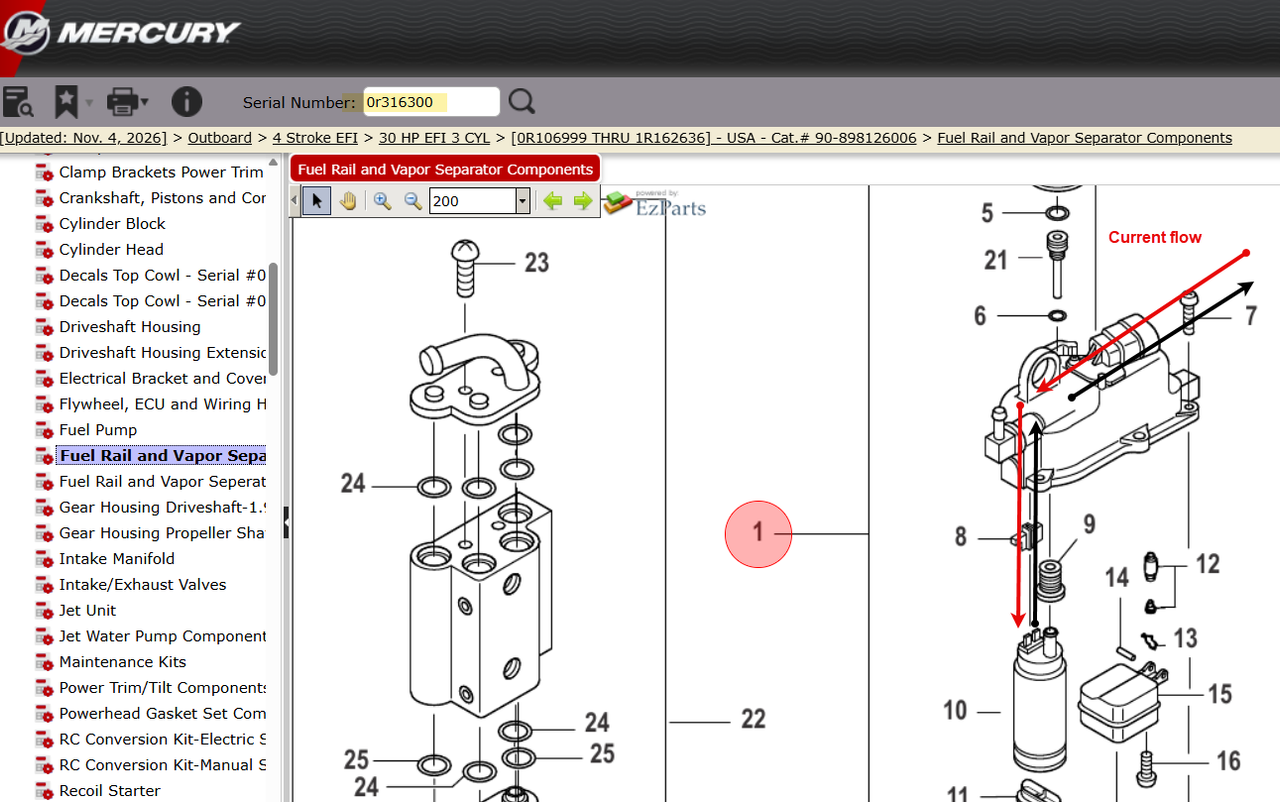
I've examined the Mercury parts diagram and an older service manual. Both show the yellow plastic connector, but neither identifies it as a separately replaceable part.

My questions:

  1. Has anyone disassembled this particular VST and examined the yellow electrical pass-through?
  2. Is the yellow connector removable, and how is it retained?
  3. Are there wires or terminals underneath it that could develop an intermittent connection?
  4. Can this be repaired without replacing the entire VST assembly, which costs approximately $980?
I'll attach photographs of the connector, engine identification labels,

I'd especially appreciate hearing from someone who has worked on this particular VST.

Thanks!
8D77FC46-93E3-4B67-AB01-78D630CCC9E0 copy.jpg
4BF6F771-BAE8-4FF4-BA1A-E2AD86F098E7_1_201_a copy.jpg
321D0F0F-FE0A-4CBD-BA89-66B7967172DF copy.jpg
 

Attachments

  • vst.jpg
    vst.jpg
    698.4 KB · Views: 20
Have you owned the motor since new?

The connections in the wiring to the connector at the VST does not look stock.
 
The press test is the useful part. If pushing on the connector brings the pump back, the pump itself is probably not the problem. That joint is what carries the pump current, and a joint can look perfectly clean and still drop it once there are amps flowing.

Put a meter across that connection, not to ground. Backprobe the same wire on either side of the yellow piece with the pump running. Good is close to zero. A couple of tenths of a volt is already a bad joint and it will only get worse as it warms up. Same test on the ground side, because the return may be going through the housing, and corrosion behind that flange will act exactly like what you describe.

The yellow piece. I have not had that exact VST apart, so treat this as a maybe. On the ones I have seen, the pass through is pressed into the aluminum with a small tang and it is not sold on its own. I could not find it in the breakdown either, which is why the whole tank gets quoted. If it is loose in the housing, you are not going to fix the tension from the outside.

Before you go at the housing though, look at what boscoe said about the wiring not looking stock. Somebody has been in there. A crimp or a splice tucked under the loom will do exactly this, and it is a lot cheaper to sort out. Bend and pull the harness while it is running and see if you can make it quit.

One more thing. Feel that yellow piece after it has been running a few minutes. A loose terminal gets hot and the plastic goes brown around it. If it is already warm, stop pressing on it while it runs, the arcing is what finishes them off.

If it does come down to a bypass, that tank holds fuel under pressure. Empty it, do it outside, away from anything, or hand it to someone who is set up for it. Not a garage job. Is the serial 0R316300? I would like to look at the breakdown for that one. thanks
 
The press test is the useful part. If pushing on the connector brings the pump back, the pump itself is probably not the problem. That joint is what carries the pump current, and a joint can look perfectly clean and still drop it once there are amps flowing.

Put a meter across that connection, not to ground. Backprobe the same wire on either side of the yellow piece with the pump running. Good is close to zero. A couple of tenths of a volt is already a bad joint and it will only get worse as it warms up. Same test on the ground side, because the return may be going through the housing, and corrosion behind that flange will act exactly like what you describe.

The yellow piece. I have not had that exact VST apart, so treat this as a maybe. On the ones I have seen, the pass through is pressed into the aluminum with a small tang and it is not sold on its own. I could not find it in the breakdown either, which is why the whole tank gets quoted. If it is loose in the housing, you are not going to fix the tension from the outside.

Before you go at the housing though, look at what boscoe said about the wiring not looking stock. Somebody has been in there. A crimp or a splice tucked under the loom will do exactly this, and it is a lot cheaper to sort out. Bend and pull the harness while it is running and see if you can make it quit.

One more thing. Feel that yellow piece after it has been running a few minutes. A loose terminal gets hot and the plastic goes brown around it. If it is already warm, stop pressing on it while it runs, the arcing is what finishes them off.

If it does come down to a bypass, that tank holds fuel under pressure. Empty it, do it outside, away from anything, or hand it to someone who is set up for it. Not a garage job. Is the serial 0R316300? I would like to look at the breakdown for that one. thanks
Yes, OR316 300. I understand your safety concerns. The boat is on a lift on Keuka Lake, not in a garage. I had a mechanic make a house call and he thought the problem was with the computer not telling the pump to run. After trying everything he could think of I asked him to take power off the battery, into a fuze , up to a toggle switch on the dash and back to the VST. That’s why you see two red wires and two crimp connectors. I have tugged on those crimp connectors to see if they were loose and they are not. When you say a crimp tucked under the loom, do you mean the wire is not properly inserted into the crimp? Wouldn’t I be able to pull them apart? Also I’m not sure how you want me to use the meter. With it energized with the pump running test for volts between those two red wires? We would expect 0 V? The hot side should give me 12 V to ground but you want me to test between the two, because if I see anything significant, it is an indication of a poor connection?
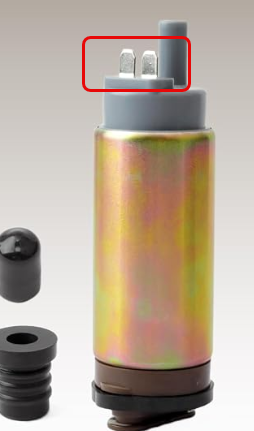
The yellow plastic piece is only slightly loose in relation to the aluminum. I was imagining that it was running through a rubber grommet and that a little wiggle would be normal, but I don’t know and the parts breakdown that I have seen doesn’t have enough detail. I don’t know what the yellow plastic looks like on the inside of the VST and I don’t know if there is more to it than a simple pass-through. What happens inside the VST? Are there wires coming out of the yellow plastic, down through gasoline to the pump? If so, could the problem be in the connection between those wires and the yellow plastic piece? And if there was a spark inside the VST would it cause explosion or a fire? There doesn’t seem to be any gasoline leaking out from under the yellow plastic.
The yellow plastic piece doesn’t seem to be getting hot.
 
Most electric high pressure fuel pumps have battery voltage whenever the key switch is on. The ECM provides the ground to turn on the pump. If the pump is not being grounded, and the wiring is in good order, then the ecu is faulty. Needs to be replaced.

Remove those splices. Provide battery power to the correct wire and a direct ground to the other wire. If the pump runs, which it should, the pump is not the problem.
 
Thank you for your reply and the good information. I should've mentioned that I didn't get a year of use out of it the way the mechanic provided current to the pump. Do you suppose that the problem could be wiring inside the VST between the yellow plastic and the pump? I think it's possible that the ECM is OK and the problem all along has been this electrical connection that seems to react to my pushing up or down on that yellow plastic piece. the parts breakdown you gave me here is better than the ones I have seen, but I still can't see what the yellow plastic looks like inside the vst. are there flexible wires dangling from it running down to the tabs on the pump? could the problem be inside?
 
Do you suppose that pushing down or lifting up on the yellow plastic piece could transfer a little bit of force onto those pins? If they were a little bit corroded, I can imagine how that might improve the contact
 
Back
Top