Logo

Installing new saddle tanks on my 22' cruiser would like less stern weight

ok I think this time I've figured it out. that bell is two parts one bell goes on outside hull 2nd bell goe's on inside.
vent bells 2piece.jpg

this is another name brand but appears to be correctly installed not sticking out.


vent not sticking out.jpg

here's the name brand I have sticking out they don't know how to install there own crape dam
amazon image of this dam vent sticking out.jpg

I've wasted hours searching this crape apparently attwood an there cheap plastic is designed to stick out an unbelievabley low.
vent sticking out from hull2.jpg
 
Last edited:
I hope I have the correct tank on port side? The inside of tank is flat up against the freeboard. I’ll stuff some thick marine plastic inbetween. The orginal tank actuely left rub marks on freeboard.


Here’s the port tank on port side which I believe is correct tank for this position
will secure the bottom w/ 1/4" bolts on both ends. will secure the top w/ reviited angle.the original flange is holding the front from sliding forward.there isn't an original flange on the rear.
.image

Iport tank mounted porperly front.jpg

Iport tank mounted porperly outside.jpg

Here’s the what I think is the star tank on port side.this is what I've been stressing over
considering adding a red flange for just a bit of extra rear surport.
aft end of port tank.jpg


mite not use the new fuel filler cap the Old fuel fill cap w/ ground wire at top of tube will simplify the grounding of cap.I believe the rubber insulates any static electricy.
old fuel cap.jpg


fill an vent tubes connected.
fill an vnt tubes connected.jpg


My vent in freeboard doe’s go vertical for about 1 ½ “ then horizontal for about 12” then straight down into tank.it's hard to see this vent tube in above image.
vent in freeboard doe’s go vertical for about 1 ½.jpg

vent mounted properly half of bell w/ gasket outside other half inside when I patch the original vent hole I'll cover the upper half of new vent.will appliy a couple drops of glex epoxy to the vent s threads so it won't come loose.
vnt mounted porperly.jpg

undecided about reusing the orginal vent on star tank will porbably get another 360 type now that I know how they are installed.I'll probaly continue on w/ my 19gallon below deck that I use above deck as the secondary.
 
Last edited:
you don't want any of the metal fuel fittings 'insulated' - you want them bonded to a common potential. Static discharges around open fuel fittings are not enjoyable events.
 
the new tanks original fill caps are rubber at top where mounted to gunnel. the metal fill tube that fits inside the rubber fill tube, has the bonding ground wire attached to the metal just under the lid. it's hard to see in this image.
orginale longer filler tube lower right no ground.jpg

what do you think do I have the correct side tank mounted?
is my routing of the vent tube aceptable?
thanks Makomark
 
if the vent hose is like your drawing, that should be good to go...

The tanks really don't care which side they are mounted to...as long as the fittings line up with the holes in the deck, which goes where should be pretty clear. As long as the tanks are supported and secure (so they don't shift) you should be ok...

not sure what the plan is for the 19 gallon tank...
 
When I restored the vessel some ten years ago I used this Moeller as the primary tank worked great weird thing is it's rated as 19 gallons but I only max it to 15gallons an yes it didd balloon up a bit.image
moller fuel tankpspecs.jpg


no fuel preasure2.jpg

(new rigging will be completely tucked up under gunnel.)
It’s actueley a below deck but I mounted above deck. I know it works so until the new tank has proven itself I continue w/ the Moeller. Additionaley I covered this Moeller w/ a wooden box.image


o


objectives w/ new saddle tanks is to reduce stern weight so I can install the 9.9HP kicker, gain deck area, an carry more fuel. so new saddle tanks are 20gallons each will continue w/ the two 6 gallon reserves.total 52 gallons.
previously one 15 gallon orginal saddle tank, the Moeller 15 an the two reserves total 42 gallons.

my new ETEC engine will get more than double fuel mileage than the 04 looper. so w/ 52 gallons thats good for a 3 day cruise, (I hope).


when I install the star platform the start battery will be under platform, I've relocated the oil resovior to well before midship to inside cabin will strape to the new extended platform. more on that later.


moller in rear4.jpg

moeler gauge
DEFECTIVEBOSHGUAGE.jpg


I never grounded the moelers fill cap or it's tank body I assume these plastic tanks don't need grounding?thanks Makomark
 
Last edited:
damn, that's a lot of fuel but if you want three days away from a fuel dock, that should be good...

you don't have to ground a plastic tank BUT, if the filler has a metal deck fitting, it should be grounded...
 
I dislike buying any amount of fuel at the marina I think they don't sell enough an there fuel is basically stale not to mention way over priced.it sure makes fueling easier though compared to fitting into gas stations,when fueling the 19 Moeller an the original saddle I've been getting away w/ using one fuel pump when I ditch the 19 Moeller
for two saddle tanks the hose won't be long enough so I'll be forced to use a 2nd fuel pump which is kindof a inconvenience.

the filler has a rubber deck fitting but the filler tube is metal. just teflon taped the new fuel water separator
used three wrapes of tefon tape an snugged the barbs an the blockoffs.

plan to connect an run the wiring for the tank, the gauge an the gauge toogle switch more on that later.
 
First splash couldn’t build fuel preasure had to connect directly to portable tank.

no fuel preasure1.jpg


During my first splash w/ new ETEC I only used the portable connected to 3way valve, then into water separater/filter then to engine.


Even though I can blow air though the 3 way valve, I bypassed the 3 way still no building preasure. So I bypassed both 3way an the filter.

Came out of portable 6 gallon an was able to build preasure.


Prior to splash The brand new type water separater/filter ((imitation racon) w/ the builtin see though water collection cup on bottom of filter leaked.


What I did was reuse the top section where the fuel tubes connect a use a new Serria spin on filter in the back yard it seamed to build pressure but not real stronge.


The imitation filter appeared to be the exact same size as the Serria.


Here’s where I have the 3way an filter mounted I’m not using the plastic lined grey fuel tube anymore.


Fuel tube out of portable into the 3way out of 3way into filter out filter into engine primer bulb arrow pointing toward engine an in a horizontal position pointing upward.


Secondary tank approchemently 4’ of fuel tube to 3way. Out 3way 14” fuel tube to in of filter out of filter to primer bulb about 2 ½’ fuel tube

Out of primer bulb to front of engine about 3 ½’.


Something is incorrect. w/ my fuel tube arrangement an yes I have the 3way valve set correctly.

However it’s basicely the exact same as when I was using the Mollier

As the primary tank minus the new imitation racon filter top back then I used the serria filter w/ serria top part where the fuel tubes connect.


Plan to back trace again to eliminate each piece.

I need more than the engines fuel filter an screen filter inside the VST, I want filtered fuel before it enters engine.


BTW the ETEC was hitting on all 6 sounded good however mounted to high but have a good idea she’s propped correctly w/ the old prop from previous engine more on that later.

Please advise an thanks
 
Is all the fuel lines above the tank?
What size lines?
Calling it a 3-way valve, is it only left, right and off or something else?
 
Is all the fuel lines above the tank?yes the tank I used is on the deck about 1' under the 3 way valve.
What size lines? 3/8 inside diameter.
Calling it a 3-way valve, is it only left, right and off or something else?
turning pointer of valve to port is port tank. pointing it down is star tank pointing it up closes valve.

this is the same arrangement of 3 way valve an filter when I was using the 19 gallon moiler tank except for the imatation racon filters top (which I'm using the top section that has the fuel lines attached).

the moiler tank is actuely a below deck type
moller fuel tankpspecs.jpg


that I used above deck inside a wooden box never had a problem w/ fuel pressure.
moller in rear4.jpg

during the shakedown run I used the red portable sean in image.so it's a little shorter than the white moiler

I've had my new engine for 15 months during this time I've cranked her up religiously every 30 days or so an run her for like 10 minutes.
during this 15months using the same portable tank w/ no valve or filter pressure was builtup ever time I could feel the primer bulb moving the fuel an eventually get hard after say 3 or 4 pumps.

what was strange during this 15 months the primer bulbs arrow was pointing toward the tank not the engine which I think is the correct flow of fuel the arrow should point to engine.

so when I installed the valve an filter I changed direction of primer bulbs arrow to engine.

when using the moiler I reused the orginal vent which is well above the tank an also above both valve an filter.
Orginal vents height.jpg

when using the portable w/ valve an filter the the portables vent is basicely the fuel lid loosened well below the valve an filter.

thanks Alldodge for advise.
 
Last edited:
Was trying to figure location and height of components with respect to motor. A pic with no reference to location and is this looking up/down makes it kind of difficult for me. Think the filter and valve is on the starboard of the motor, on the transom

There is currently no issue with vents because currently a vacuum is not the issue

Yes the arrow in the primer bulb points toward the motor,

This should work so long as the valve does not allow fuel to be drawn from both tanks at once. Check you fuel filter connection on the canister filter. There are arrows on the head and then should point for fuel flow to the motor. Disconnect the fuel line at the motor and use primer bulb to bleed out all the air before reconnection

fuel.jpg
 
Was trying to figure location and height of components with respect to motor. A pic with no reference to location and is this looking up/down makes it kind of difficult for me. Think the filter and valve is on the starboard of the motor, on the transom

There is currently no issue with vents because currently a vacuum is not the issue

Yes the arrow in the primer bulb points toward the motor,

This should work so long as the valve does not allow fuel to be drawn from both tanks at once.no valve will only draw from one tank thats selected Check you fuel filter connection on the canister filter. yes I have these arrows on cannister pointing to engineThere are arrows on the head and then should point for fuel flow to the motor. Disconnect the fuel line at the motor and use primer bulb to bleed out all the air before reconnection OK I'll pump air out then reconnect

View attachment 36293
imatation racon filter in an out orientation image
imatation racon filter in an out orintation.jpg

image of arrows it's hard to see the arrows but I do have them as in left image same direction to engine.
imatation racon filter in an out orintation arrows.jpg

the filters canister has the correct size 3/8” fittings image.
imatation racon filter in an out orintation 3 8th fittings.jpg


Heres the engine an rig tube image
vessel at rest2.jpg


I will pump air out of line up to engine as you suggest I assume I will then feel the primer bulb fill an push the fuel? thanks again Alldodge will report back. hopping to do 2nd shakedown runs for engine height an prop dial in this week.

in above image at rest engine is a bit high I lowered it 1 1/2" I hope the prop is now deep enough.

edit: I just went out to double check the filters top section I can confirm it’s connected correctly in from valve out to primer bulb then out bulb to engine.
imatation racon filter in an out orintation 3 8th fittings mounted in an out.jpg
 
Last edited:
I did get the port side saddle tank (W/your an all dodges advice) mounted/vented/plumbed the fill tube fill cap mounted,exit tube, 3way switch, grounded the tank ran wires for gauge an even more.
had problems w/ the external water fuel separated had to bypass an just use the engines water fuel separater for the shakedowns.
I do have the star platform mounted. however installing the star tank may require removing the cabin doors vertical brace.
which will be a bit involved but doable. I've been want to reduce the width of the cabin door a bit.

you know I splashed the vessel several times dialing in the engines height an dialing in the prop. where I'm kindof satisifed to continue to use the vessel as is. the ETEC isn't as powerfull as the previous 05 johnson175hp carbed.


the ETEC is running great however I've decided to buy a parts engine w/ a blow power head an swap my power head to it's midsection to have a 25" shaft.
I have a newer nicer floatation pod. so not sure how long I'll use as is. I'll probaly use for few more cruises this spring then redo the transom to a full transom but will keep my latest transom rebuild just cover the splashwell. w/ new pod. will post new thread then.
wished I'd made this decision before I rebuilt the splashwell transom. full transom would take much less time designing an rigging.
 
I think the star tank will be much easier. wonder why Evinrude changed the engines fuel filter to a water separator (that even has a two wire sensor for water). I assuming bc some ppl don't use a fuel/water separator in the fuel line.

remember I had difficulty w/ the inline filter. could have been a cheaply made that was I think could have been bleeding off pressure.
 
update on fuel situation haven't attempted to resolve the fuel not being able to pass the new fuel water separator. basicely just relieing on the engines water separator during the shakedown runs. I haven't even put fuel in new saddle tank but will shortly.for right now on next upcoming cruise I intend of resorting back to the 19gallon Moiler as my primary tank an use my two 6gallon portable reserse tanks.

mite plum new saddle tank as secondary. I have a siphon but would prefer to not transfer fuel,

I recently purchased a specter portable I swapped an OMC connector on an it's working fine plus no leaks.
not sure why they picture it verticaly seams like fuel would leak out the vent?
6 gallon scepter neptune.png


my OMC 6 gallon leaks at sender an gasket real thin
OMC portable 6 gallon.jpg

OMC 6 gallon sender an gasket real thin.jpg

hopping this gasket maker is suitable couple years ago I attempted to smear on outside of the senders housing an failed miserably
I can use baby medicin syringe to insert into the tiny crack where orginal gasket sits. the orginal gasket isn't broken or cracked not sure if I could just smear on both sides an reseat?
image
OMC 6 gallon sender gasket maker.jpg

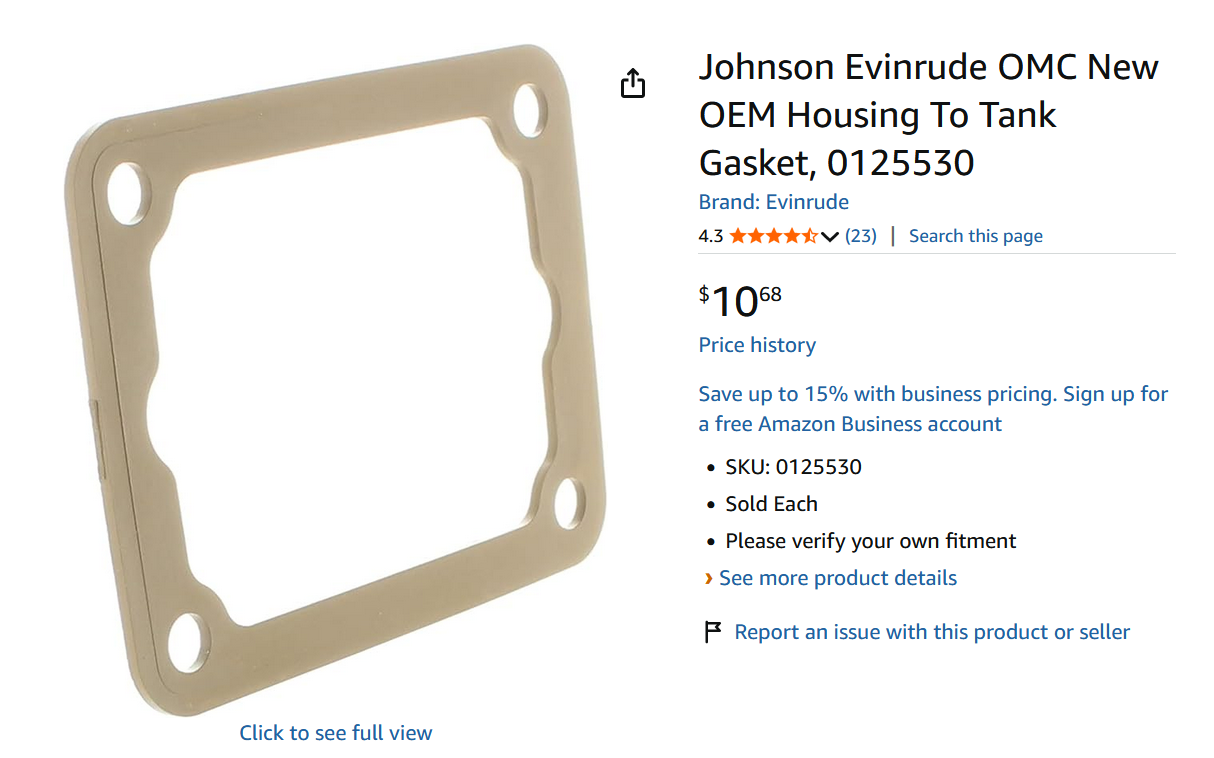
OMC portable 6 gallon need gasket Johnson Evinrude OMC New OEM Housing To Tank Gasket, 0125530 on Amazon
amazon appears incorrect so doe's the ebay gasket for 6gallon portable image
amazon incorrect gasket for 6gallon portable.png

ebay portable 6 gallon gasket not correct size image

ebay portable 6 gallon gasket not correct size.jpg


scepter fuel tank instructions never knew to dissconect fuel line from engine after use. image of instructions.
scepter fuel tank instruchtions.png


why does Evinrude not recommend using small portable 6gallon tanks on 175hp engines?

additionaly I like the vent builtinto the septer fill cap. weird the plastic Evinrude tank doesn't have a vent like when it swells up I just crack the fill cap unlike my older OMC 6gallon portable it has a screw vent builtinto the fill cap.
thanks for advise
 
Last edited:
Update on the saddle tanks:


Port:


I have fitted the port, secured it to platform, connected fill tube w/fill cap,connected vent tube to newf reeboard vent, wired senders an fill caps ground wires together an ran to negative bus bar, senders positive to gauge also connected pickup to three way valve an to water fuel separator.


I need to properly insulate these tanks from the hull both are presently pressed up agaisnt the aluiminum freeboard so there basicely electricaly part of the hull, (not good on a saltwater vessel creates electrolis's).


the wooden platform isolates the bottom of tank, my plastic blocks where to hard to manage in place.


I was considering marine adhesive rubber stripes glued to freeboard may attempt if current new plan doesn't materialize like the blocks.


My new plan is to wrape the top w/ a slice of marine plastic this white plastic my fan is sitting on


image:
isolating plastic.jpg


basicely heat plastic w/ heat gun anform a U long freeboard side around the top an then down the exposedinside vessel.


I've also opted to not use a metal fillcap in fear of sparks igniting gas fumes will use a nylon type.


From my research these sparks w/ thefuel stations nozzel is the least of my concerns it's the fuel itselfcreating static FluidFriction Static.


Sonow after all this work for saddle tanks probley over 100 in actuelphysical work fitting/fabbing ect.another 100 in reasearch. I maybeswitching to plastic saddle tanks.


Nowwhen I initialy started using the vessel back in spring 2016 I usedone of the orginal steel saddle tanks


itcame from the factory in direct contact of the freeboard an therewasn't even a ground wire on it's fill cap.


Inever paid any attensoin bc I did'nt know anything about fuel tanksafety untill now.dam.
 
If you have a metal fuel tank, it is supposed to be "grounded", to allow for dissipating any static buildup...you may want to look into this a bit deeper. same thing with metal fittings in the fuel system...

You can address the galvanic concern by keeping things dry as an alternate...no conductive liquid = no electron movement = no problem
 
good tip on keeping stuff dry. yes did hours of research on grounding an isolating the tank. if it where none metal it would much easier to isolate electricaly.

Diffaculty no fuel pressure:

no fuel preasure.jpg

untill I'm satisifed w/ the new tanks installation mainly the isolating tank from hull, I've allready grounded it to neg bus bar.

I've switched back to the Moiler 19gallon never had any problems w/ it building preasure until now.never even bothered to ground it either.
garden hose hanging overboard.jpg


I have a new fuel water separater


pumped over 30 times never felt fuel enter of leave the primer bulb which I hold vertical w/ it's arrow pointing toward engine.


I removed the water fuel separater filter an it was only halfway full.


The tempuary vent is a garden hose hanging overboard. the orginal freeboard mount vent broke I tryed to glue it back but broke again it's located right where the bulk of rigging is. so I only have the hose now.
broken vent.jpg


I'll start w/ checking moilers pick upt ube to the 3 way valve, valve is clear.


Then maybe remove the moilers pick up tube, check it an the anti flow fitting ontop of the pick upt ube, then maybe the vent assembley not sure if these plastic tanks come apart.

ontop of this crape the molier gauge took a dump I have it wired exactly like this.
moeller fuel guage wireing.jpg

when I switch the key to acc my new trim gauge bumps so I know it's getting 12VDC I'm stealing 12VDC from another gauges purple wire I'll have to confirm this voltage.

planning to isolate the new port from freeboard hopefully this weekend if I like then will try out new tank.will report back.

Please advice an thanks
 
I've had more problems w/ this imatation raco water/fuel separator. first see though bowls drain leaked.
. so I threw the fliter in trash however I'm using the fliter mount (black part). the serria fliter screws on just fine.

now the addtvertisement doe's say for Mercury maybe mercs are backwards? an I have in for in an out for out which mite be backwards?

cheap water fuel separater2.jpg


swapped in a decent serria filter now no fuel presure dam.

I assume the arrow (you can barely see) flow points to the engine is how I have it connected.
cheap water fuel separater.jpg


note right side is input closest to bracket an out is farest from bracket. but after 30/40 primer bulb pumps the filter is only half full, an never felt fuel enter or leave the bulb.
this fliter is most likey the bottleneck (not the moiler anti reverse) bc when I connect either of my portable reserve 6 gallons both pump fine when I bypass this dam filter. maybe the arrow on the filter is chine backwards?

I assume I could blow though this dam thing to test flow.

cheap water fuel separater input an output.jpg

I'll have to switch input an out put.
no fuel preasure.jpg


yes gauge is wired correctly unless molier has reversed the color code on the senders I assumed black is negative an white is sender. there instructions have the tanks sender as red. I'll check acc 12VDC an then reverse the sender an ground.
moiler sender isnt red but white.jpg


additionaly molier is publishing misinformation on how to instal a fuel tank note the fuel fill clamps should be opposing each other, no dip in vent dam these ppl..

moilers missinformation on tank install.jpg
 
Last edited:
quick conseltation w/ alex amazons bot

this outlet being 1/4" won't cause no fuel preasure an cause fliter to not fill but will create a restriction my ETEC needs 3/8" of inside diameter not 1/4" maybe time to order another fliter. will be bypassing this garbage for next cruise. like I do have a water fuel separater fliter on the ETEC so I do have some flitration untill I sort out additionale external fliter.dam

Customer question

what is fuel inlet from fuel soucre
It looks like you're viewing the S3213 Fuel Filter Water Separator for Marine Outboard Motor. Are you asking about the fuel inlet connection on this filter?
If so, here are the key details:

Inlet fitting:3/8" Barb fitting (fuel source side)

Outlet fitting:1/4" NPT brass fitting

PTFE thread tape is included to help seal the fittings and prevent leaks

Designed for outboard marine engines — compatible with your Evinrude setup
The 3/8" barb is where your fuel line from the fuel source (tank) connects. You slide your fuel hose over it and secure with a clamp.
Could you clarify what specifically you'd like to know — are you asking about the fitting size, hose compatibility, or installation?
Customer question

what do the arrows signify
On a fuel filter/water separator like the S3213 Fuel Filter Water Separator, the arrows indicate the direction of fuel flow through the filter:

Arrow pointing IN = fuel inlet (from your fuel tank/source)

Arrow pointing OUT = fuel outlet (to the engine/carburetor)
This is important because installing it backwards (against the flow arrows) can:

Restrict or block fuel flow

Reduce filtration efficiency

Potentially damage the filter element
Quick tip: Always follow the arrow direction when mounting — fuel flows from tank → through filter → to engine.
Is there anything else about the installation you'd like help with?
 
a fliter isn't universal just bc it screws on dam. currently have the serria 18 7944

will serria fliter serra 18 7944 fit?
No, the Sierra 18-7944 will not fit the S3213 bracket. Here's why:
The Sierra 18-7944 uses an entirely different thread standard:

Spec​

Sierra 18-7944​

S3213 Bracket​


Thread Size
11/16"-16
3/4"-16

Filter Height
3.875" (short)
Standard spin-on

Designed For
MerCruiser Stern Drive & Mercury Marine EFI
Outboard marine engines

Replaces
Mercury 35-802893Q, 35-807172
S3213, 18-7919, 18-7932-1

The 11/16"-16 thread on the 18-7944 will not thread onto the 3/4"-16 head of your S3213 bracket — those are incompatible thread sizes.
For your S3213 bracket, the confirmed compatible Sierra filters remain:

Sierra 18-7919 — direct S3213 spin-on replacement ($29.40)

Sierra 18-7928-1 — Racor-style fuel/water separator ($52.00)

Informed by Advance Auto Parts, RVupgradestore.com, Wholesale Marine, jamestowndistribut…

Customer question

the 18-7944 will thread on I have it on right now but cant build presurre
I appreciate you catching that — you're right that the 18-7944 will thread on, but here's why you can't build pressure:
The Problem:The Sierra 18-7944 has a mismatched thread pitch (11/16"-16) that creates an improper seal on your S3213 bracket head. Even though it physically threads, the different thread standard causes:

Poor sealing at the connection point

Pressure leaks that prevent fuel pressure buildup

Potential fuel weeping around the threads
Your S3213 bracket needs a 3/4"-16 thread filter. The 18-7944's threads don't sit flush, leaving micro-gaps where pressurized fuel escapes
 
Difficulty w/ fuel pressure


currently using moiler as star tank


note I have the port valve closed an the star side open note how short the 3 way valve feed tube is.image.

no fuel preasure.jpg


I am able to blow though this star fuel line from the tanks fuel pickup tube though the 3 way valve an filter (this w/ filter removed just to test)but can't seam to pump much of any fuel to fill dam filter an develop any fuel pressure.


after 50 bulb pumps w/ primer bulb held vertically all I got was this at bottom of filters water bowl an still empty filter well a tiny bit on bottom nothing much. an yes I have the S3213 head bracket w/ a brand new S3213 filter w/ water bowl. this is fresh stabil treated top tier fuel from Costco from image
after 50 bulb pumps all I got was this an still empty filter.jpg


fuel input on right output on left of fuel filter head bracket image


cheap water fuel separater input an output.jpg


why can't I build fuel pressure? W/this dam filter.


Only way I can build pressure is to bypass this dam filter so I know the bulb/ an antispion valve are both fine. initialy the anti spion valve had some dirt I pressed down on the ball bearing a few times to dissloge the dirt an now I can blow though this AS valve. Dam.


In conclusion for right now I can only think the filter is mounted to high the primer bulb is either same level or a tad lower than filters height.


fabbed some nylon around back an top of port tank one for rear 2nd for front plus a angle piece inbetween the tank an freeboard flange. this isolates an allows airflow inbetween tanks an freeboard to keep fuel cool. image
fabbed some nylon around back an top of port tank.jpg


freeboards vertical flange now isolated w nylon angle stripe image
freeboards vertical flange now isolated w nylon angle stripe.jpg

so now I'm satisfied tank is isloated from hull an I'll probaley start using this port tank soon.


Please advise on lack of fuel pressure an thanks
 
Please advise on lack of fuel pressure an thanks
Is the arrow on the bulb facing toward the filter?
Are you sure the bulb works?

Also do the fuel valves installed have check valves in them? Normally the pointer on the valve points toward the motor not the Tee or filter
 
Is the arrow on the bulb facing toward the filter? no pointing toward engine
Are you sure the bulb works?yes bulb pumps fine when I bypass this dam filter I even feel the fuel flow though in an out the bulb an this isn't a el cheapo bulb it's an attwood $20 https://www.amazon.com/dp/B0053HP43I?ref_=ppx_hzsearch_conn_dt_b_fed_asin_title_5

. bulb.not that $5 crape..

Also do the fuel valves installed have check valves in them?no check valve either the valve is manuely opened or closed, I'm able to blow air though the whole problem section air blows though antispion though fuel line out of fuel tank though 3 way valve an thought he filter head just nothing out this dam new filter. Normally the pointer on the valve points toward the motor not the Tee or filter
could this filter be mounted to high? right now I have bypassed this new dam filter an I have perfect fuel pressure. but I don't want to rely on just the engines water fuel separator I'd like the extra protection that most ppl have two filters. thanks AllDodge
 
Back
Top