Logo

2004 BF225 25" extension case driveshaft bearing (bushing) question

Scubagrog

Contributing Member
Bought an almost new lower unit for for my 2004 BF225 XA (25") and long story short, what I actually got was a 30". The seller offered to take it back and get the shaft reworked to the correct length. I just got it back and the shaft length matches the old one perfectly, however, the thickened area of the drive shaft where the bearing is in the extension case is 5" too high. It appears the shaft was shortened at the spline end and not at the bottom. I have read some posts that mention what seem to be second hand accounts of 25" models running just fine without the bearing installed, but was wondering if anyone has any direct knowledge of it. I wouldn't actually be running without the bearing, just having the spot of the driveshaft for the bearing not sit in the bearing (that part on the 30" shaft is smaller diameter), so it would be about the same thing as it missing.
 
Last edited:
On a similar note, I have the old unit's driveshaft and it seems to be in good shape, but I'm a little leery (and lacking of the special tools) to swap the driveshafts. Does anyone have an idea of what I should be expecting the labor to be for such a task (assuming everything is in good shape otherwise)? I realize there are some parts (o-rings/gaskets, oil slinger, and spacers) that need to be replaced in addition, but just want to have a good idea what I'm looking going that route.
 
i recently rebuilt mine . it really isnt that difficult , but there are some special tools you would need . I made all of the tools I needed for myself.
That being said the tool that you would have to make or buy it the one that removes the special nut. Other than that it is pretty much straight forward. I had never done one. The special nut must be torqued . I can't imagine what it would cost , but Im betting it won't be cheap. Depending where you are I would be happy to lend you what I made to repair mine. Hope this helps
Gary
 
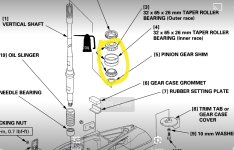
After looking through the manual, other than the special Honda tools, the only thing that gives me pause is having to change up the shimming on the shaft. The numbers don't bug me, but my measurement accuracy does somewhat. Hopefully that is unwarranted. From what I gather in the manual, since the only thing that is changing is the vertical drive shaft (I plan on using all of the other parts from the new unit), the shims on the vertical shaft should be the only thing that needs to be changed (Let me know if this isn't the case, anyone).

Thanks for the offer with the tool for that nut, but I actually already have one on the way. I found it for like $160 (US). Everywhere else looked like it was $220ish. I don't know what Honda found wrong with using the 3 or 4 bolts up there like all the other manufacturers seem to use (other than discouraging you from working on it and putting business back to Honda techs). I would be interested in seeing what you did if you have a post or picts of it.

I got started on taking the donor unit apart yesterday (can't finish until I get that lock nut tool and some shims) I did have a heck of a time getting the prop shaft assembly out (really bad corrosion). Heating things up didn't seem to help, but all I have is a propane torch and didn't want to buy too many tools that I probably won't ever use again. I didn't think a "regular" puller would work because it would need to push on the prop shaft and with the retaining nut they have in that assembly, you wouldn't really pull on the stuff you want out until something breaks on the prop shaft or the stuff on it (and possibly jam into the vertical shaft/pinion gear on the end of it). While I'm not really worried if something other than the vertical shaft breaks in the process, I hate to break something if there is a fairly easy way around it and I don't think anything is wrong with this prop shaft, so having one around as a backup might not be a bad idea. Anyway, I pieced some stuff together to basically pull on the prop shaft using the threaded area where the castle nut goes while pushing back on the bolt holes in the case. I'm thinking about making a post on that to hopefully help someone out. Hey, after typing that I just figured out why they call it a castle nut. I always thought it was someone's name.
 
Hi. The easy way to get the prop shaft out is to put a slide hammer on the end of the prop shaft. It is an 18mm. I only used a heat gun to heat it up. It came out easy.
To put it back in reverse the process. The only thing you have to do is get an 18 mm nut and weld it on to a nut of the same size as the slide hammer . I have pictures of what I did . The trouble is I always have a hard time loading them.
You are correct that the only thing that would have to be changed would be the shims, provided everything else is ok. There is a tool that Honda sells to check the axial play of the vertical shaft which is determined by the shims . It cant be very ex[pensive , it clamps onto the vertical shaft and you put an indicator on it and read how much radial movement there is. Very easy. It shows it all in tehe service manual. Let me know what pictures you would like to see, and if I have a pic I'll post it . If there is anything elde you would like to know let me know. I've been a machinist for 53 long years . So if you have any questions just ask.
Gary
 
Yeah, I ordered one of those tools for the radial movement, kinda expensive for a pipe clamp and a piece of metal, but I guess you're paying for the precision. BTW, started taking working down to as far as I can without removing the lock nut on both cases. Had absolutely no problem getting the shift shaft from the old unit. Just got the plastic cap out of the case and the whole thing lifted right out with no real resistance at all. I got the cap off of the newer unit easily, but it won't budge. I have it in neutral as the manual says (confirmed it by rotating the vert shaft), but it seems like something is hanging it up. I saw a video where a guy was removing the shift shaft and prop shaft holder assembly to change O-rings in the lower unit and he said to put it in forward (I verified it shifted to forward as well). I tried that as well and same thing. The shift shaft seems to be working just fine, however it will not come out. Any ideas? (made a new post about this as well so it has a subject line that is more relevant to this issue).
 
Here is a picture of mine. I just did this 3 weeks ago
 

Attachments

  • 20250421_164916.jpeg
    20250421_164916.jpeg
    148.7 KB · Views: 45
Here is a picture of mine. I just did this 3 weeks ago . I don’t know how to highlight the area where the case oil seal is . But if you look where the fuel tube is hanging the cover is just to the left. Sorry to say but this is where you have to get to .
 
That shift shaft should come right up . Does it shift ok? I would put it in neutral and put two pieces of aluminum one on the flat and one just opposite. Put a pair of vice grips on it and clamp it . Then using a pry bar try lifting up on it underneath the vise grips. There is really nothing to hold it in there . Let me know how you make out.
Best Gary
 
That picture looks like too much fun for me to handle. Did you mean to post that somewhere else? I thought you were posting picts of the tool you used to remove the lock nut to get the vertical shaft out.

The unit has never been installed/in the water. But turning the shifter with pliers, it shifts just fine (verified but urging vert shaft and watching prop shaft turn or not turn).

I was expecting it to just lift out. The one on the donor unit came out with no problems at all.
 
All I did was use a piece of square tubing. Then welded corners to fit the nut. Put a side piece with a nut for the torque wrench. Easy
Hope this helps. And yes the post with the engine was supposed to be on another thread . Sorry
 
Got some of the tools in and managed to get the vertical shaft out of the donor unit. The lock nut for the shaft came out with no problems at all. I got the pinion gear retaining nut off with just a bit of elbow grease, but the pinion gear would not come off the shaft. Finally put the heat gun to it for several minutes (saw the grease starting to drip) and it finally came right out. Kinda working through this in stages, wrapped it in paper towels and set it aside. I will need to get the bearing off of the shaft, but have the tool to do that and went ahead and got a hydraulic press (hopefully will be used more at some point, but this was the first time I have ever needed one, I actually still need to assemble it). I'm not sure if I want to use the donor bearing and pinion gear or disassemble the one in the new unit and use them. If I use the stuff on the donor unit, I should be able to change the shim height by the difference in the case codes (old one is a D, new one is an E, so it appears like I would need to add 0.05mm of shim to it. Looks like the one that's there is 1 piece, I'm thinking the 30mm so it looks like I might need (2) 10mm and (1) 15mm, but I'll try and take the measurements to confirm.
 
BTW, on the donor unit, the "needles" in the needle bearing came out.. I'm not planning on using that case (and thus the needle bearing, too), but am wondering if there are any tricks to getting them to stay in place for the new one. I've heard marine grease should help them stick. I do have the case laying on it's side right now, I assume if you turn the case right side up, they will stay in easier.
 
Hey scubagrog. FYI. When you remove the bearings use your heat gun they will come real easy. You don’t have to get them real hot.
You should almost be able to hold your hand on it. Also press on the inner race when putting the new ones on.
The needle bearing comes with a plastic sleeve to keep the bearings in place when you install it.
Hope this helps
 
Well, heat gun didn't do it. propane torch didn't do it. Went to the point of not being able to touch it with out gloves. For the "persuading", tried the way both manuals say. First used a hammer with a hard plastic end on the end of the shaft into the bearing separator (pushing on the inner race). No good. Then tried the other manual's way of using the hydraulic press into the bearing separator. No good. The shaft started flexing but doesn't seem to have permanently bent. Then went off script and tried a regular hammer with a piece of wood blocking so I don't damage the end of the shaft. No good. All of these after heat. The bearing doesn't appear to have budged. Guess I need to figure something else out. Seems like with this thing I keep taking 1 step forward and 2 back.
 
Last edited:
I’m really surprised. Now if some idiot used loctite bearing mount you will have difficulty removing the bearing.where are you located? I’m retired . If you live within a reasonable distance I would be more than happy to give you a hand
 
I'm in South Carolina. Thanks for the offer, but I'm not done yet. I'm gonna try a few other things. I've just stuck the whole thing in the freezer and will leave it overnight then try and hit the bearing with heat to see if a bigger temperature differential will do it.

Maybe I'm heating it wrong. When you hit yours with the heat, did you just try to heat the outer race? I was heating at the inner race, but it would have been hitting the shaft to some extent (it got fairly warm, too), so that may be counteracting what I'm trying to do. It would have both the bearing and vertical shaft expanding and in this case both metals are steel or SS, so they expand at the similar rates. You don't get the help of aluminum expanding more /faster than steel. It just seemed that heating the outer race wouldn't help too much since it's basically a sleeve holding the 2 bearings, but maybe it getting hot and spread enough the heat to the inner race to help loosen it.

I also had the thought of heating up some oil and letting it sit in there for a bit, but again, it would have the shaft and the bearing expanding at the same rate, just maybe the bearing being thinner material might expand a little faster.

As a last resort, I may try and cut it off. I do have a bearing set from the new unit that I can use and even if there are issues getting it off (I really doubt there will be, it has never been used), but even if there are issues with it, the new bearing set is only about $80, so as long as I get the shaft, I'll be happy. Not exactly sure what to use. I would say an angle grinder, but if some of the balls/cylinders were to come loose in the process, might be about like a musket. I also work at a place that does structural steel fabrication (I'm an office guy and don't do the fabricating), but I hate to bug those guys with non-work issues.

 
Last edited:
Ok, first I love S. Carolina. But it’s a little far for me. lol. What bearing is it exactly, so I can be on the same page as you.
If the bearing is on a shaft you only want to heat the inner race ONLY! If you heat everything it will defeat the purpose. Keeping it in the freezer really isn’t quite cold enough, but every little bit helps. When you take it out of the freezer be quick about it when you go to heat it up.If you have a bearing puller put it on and apply some good tension on it. Heat the inner race ONLY! Once it starts to move it should come right off. Don’t dwell with the heat . You don’t want to heat the shaft. The shaft and bearing are both steel .
The bearing most likely is what’s called 52100 and the shaft is probably 4150 . Hope this helps. Nothing like having something that won’t cooperate. Best of luck. If you have any questions just ask.
Gary
 
I just looked at the service manual. I’m assuming you are working on the propeller shaft? Hey feel free to call me if like. 484 883 7414
 
No, the drive shaft. Luckily, I shouldn't have to mess with the prop other than pulling the assembly. This is the bearing I'm talking about.
 

Attachments

  • Screenshot_20250604_084321_Photos.jpg
    Screenshot_20250604_084321_Photos.jpg
    374 KB · Views: 58
Ok I just looked at my pictures. Here’s what I did. You don’t really need the bearing puller . If you can get a piece of tubing that has a big enough I.d. To go over the shaft so the inner race rests on it and the other end on the table of your press. This is what I did and it worked great. If not another option is If you have parallels there is enough room to set them up underneath the inner race. The inner race would be setting on the parallels. In my opinion pushing down on the shaft against the bearing puller will have some flex, believe it or not. The set up with the parallels is rigid. If you don’t have parallels use two pieces of steel that are the same thickness. Do the same thing as far as heating the inner race,
 
Success! I actually looked up how the bearing separator can be used to start the gap between the bearing and the "shelf" on the shaft (just looked up "how to use a bearing separator" on YT. I hadn't thought that I wasn't using it to its full extent. It messed up the shims, but I'm not worried about that. I already have an assortment coming in that basically covers all of the possibilities in the chart in the manual. When we (my son and I) tried using the separator without heating first and it didn't budge. Then we took the torch to it and tried again and it made a small gap. Then we put it on the press and it pushed on through after reheating again. I think we may have lined stuff up a little better in the press this time. We also didn't heat it as much as we did yesterday. After it came off, the bearing was OK to touch after a few seconds (might have been OK right away, but I didn't try). Yesterday, I couldn't hold it for several minutes after.

I guess it just had to have that smallest of starts from the separator. I don't know if it actually helped, but we did leave the shaft and bearing in the freezer overnight. It got cold enough that I was wearing gloves to hold it. It was just a bit uncomfortable without them and made it where I didn't have to worry about the heat on the shaft. Everyone should keep a pair of welding gloves around, even if you don't weld. (They make the absolute best hot mitts when grilling.)

One other thing I got to thinking about... do these bearings need to be packed with marine grease? I don't think the manual says anything other than using some gear oil with them. I'm sure in the heating processes, it lost a good bit of grease/oil, either through dripping out or burning. They still spin amazingly smoothly.
 
I know the manual doesn’t say anything about packing with grease. One the case is filled with gear it wouldn’t make any difference the oil will wash out the grease. FYI I ran my boat for the first time on Friday . I had no issues at all and I did not pack them. I did hose the down with gear oil so they wouldn’t be dry when I started out. Congratulations on getting it apart
 
Back
Top