Logo

Getting my 20 running again!!

I will try to find something but still confused as to whether you're talking about the carb end of the cable jumping out or the remote control end?

I have little to.no experience with the top mount type controls. I've mostly only worked with side mount controls....all right side ones.

So, I'm pretty weak on knowledge about what you might need relevant to center console.

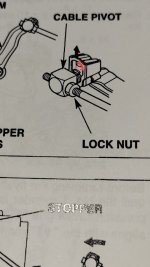
But I think that you may be saying that the CABLE PIVOT, on the carb end keeps jumping out of the throttle arm??

If so, there is a "plate" that locks it in place. See the part in the attached pic that I have partially marked red.

If that's not it then a photo would truly help me understand what you're trying to explain.
 

Attachments

  • 20251231_161709.jpg
    20251231_161709.jpg
    334.1 KB · Views: 34
That's the one!!!! The little ferrule is secure on the control cable and lock nuts are tight ..the shaft slips in with no issue BUT also slips out ..it must be the plate that's not locking it in ..Will check today and thanks!!!
 
Great!

That lock plate should have a slight arc or bend to it in order for it to act kind of like a spring to help keep it in place.

If it has gotten "flattened out" for some reason, you can often just put a little bend back in it so that it will stay in place. Just try not to bend it too far and accidentally put a crease or fold in it. I think I did that once and I don't believe that they sell those separately.


On the engine stalling issue.....
...If the SE valve isn't getting voltage when the engine is running, you have to keep in mind that the two wires from the coil under the flywheel have two bullet style connectors that are in the plastic wire holder in front of
:Starter Case B" or what I lovingly refer to as the "tool tray""

You need to check those two connectors before assuming that the coil is bad. Almost ALL of the wires in that holder have bullet connectors and those connections can get corroded and make poor contact.

Also, when people work on these, they will often unplug those connectors and then cross the wires up when plugging them back in.

That shouldn't happen because all the wires are color coded. But, I see them mixed up all the time and that causes plenty of problems.
 
Thanks mate ... hopefully the plate is still there so I'll check that. My cables coming from the SE valve are difficult to mix up as one has a male connector and the other has a female connector ..if there is no voltage measured then I would expect that I haven't pushed the connector together correctly as they were previously working fine!!
 
Further update regarding the Cable Pivot. On mine the brass fitting that extends and goes into the throttle arm has a sorta brass collar at the cable end and obviously the thinner part of the brass fitting slips perfectly into the hole in the throttle arm (but as already mentioned it slides out just as easily . Am I correct in assuming to prevent the fittings parting company, the slightly bigger diameter part of the brass piece goes BEHIND the throttle arm plate so it cannot pull straight out?? It was getting towards dusk so I wasn't sure if the metal plate slides off the top of the throttle arm and then you drop it down so it's over the brass collar??? Mine seems to have slots in the plate that would easily slide over the brass piece and prevent it slipping out.
 
It's been some time since I messed with one of these so I don't remember exactly how the lock plate engages the pin I'm thinking there's a shallow slot in the pivot pin but that might not be accurate. Look at it closely and I know you'll figure that part out.

I told you about the bullet connectors in the holder because, IF you want or need to TEST the coil under the flywheel, that's where you do it.

BECAUSE....While the cable pivot popping out is an issue that needs to be dealt with, it's NOT what is causing the engine to stall.
So, just providing you information.

If you plug in the SE wires correctly and it still stalls, you'll be needing to figure out why.

If I had a dime for every time I've heard "it was working fine yesterday", it would be WAAY easier for me to pay my ridiculously expensive California fire insurance!

Just sayin'.🥴
 
Hi jgmo
Sorry for the delay but I figured out the plate eventually . My plate is a 3 sided one that actually slides up and down on the inner throttle lever. The front part of the plate (left side looking from the rear of the motor) has a keyshape cut into it so the brass bit complete with it's collar goes into the wider part of the lever. What you need to do is push the brass piece all the way in and then with a pair of pliers lift the plate so the narrower section connects with the slimmer part of the brass tube and that locks the collar. The cutout is very similar to some picture frames that have a wide section that allows a screw head to pass thru and then the narrow section locks it in place. So that solves that issue!!!!! The motor starts easy and still runs for around 30 seconds and then starts to splutter and eventually dies and won't start again ..my multimeter wasn't at hand but I did push the connectors together and push them into their plastic/rubber slots. Should the SE valve voltage come in fairly quickly as the motor starts great and within say 15 seconds starts to lose revs and eventually dies??? The needle in the SE valve had quite a lot of orange coloured "resin" on it so it MIGHT be sticking!!! I'm assuming it's over rich as using the idle lever on the remote doesn't help as it's already way too rich.

Chris
 
Nice description of how the lock plate works. Your analogy to the picture frame hanger is spot on!

The SE valve receives voltage (12v) as soon as the engine starts. The valve is very similar to an engine thermostat as it has a wax pellet inside that expands when heated. The voltage going to the SE valve powers a heater coil to melt the wax. That takes time..2 to 3 minutes.

Your description of the engine sputtering and starting to falter after only a few seconds indicates that the SE valve is probably not the reason. Although, I would be testing the voltage anyway.

You asked much earlier in this thread about a vertical brass tube that you could see when looking past the throttle plate. That would be the low speed emulsion or "jet set" tube. See item 18 in the link below.


If you didn't remove and inspect/clean that tube and hose out the passages in the carb body that tube feeds, that could be the reason the outboard won't run.

There's just SO MUCH to cleaning these little puke carbs, it's almost impossible for a novice to get it right the first or....even.....the tenth time!

They defeat long time carb rebuild guys (like me) and are the reason I have TWO copies of the Honda Marine Carburetion Manual on my bookshelf! Because, I wasn't successful my first few times either.
Hondadude, a much respected, missed and LOVED contributor on this site told me to buy that book. He had one too!

Sorry you're having so much trouble but, at least now, you know that they require special care and feeding if you want reliability.

They're actually amazing devices at fuel delivery and economy but not after getting plugged.

I used to try to explain every cleaning detail but eventually it became evident that most want a "quick fix" and ignore more than half of what I write. I get it, IT'S A PAIN.

I have NEVER failed to "recover" one of these carbs but I stopped trying to get all others to and no longer argue if a guy just wants to bolt up a new one. It's way faster and often cheaper for some in the long run.
 
Thanks Mate
I guess the carb comes off again ..I think the original carb had the same issue. However I will test voltage tomorrow (it's 9:00pm here!!)
When you turn the key the motor starts instantly and strongly as it always used to do and continues for maybe 15 to 30 seconds then the
revs start to drop progressively (which it also used to do) and whilst running well earlier it used to almost drop to a stall and then used to
"catch itself" and continue running until it warmed up. Now it starts strongly and the revs start to drop BUT it doesn't "catch itself" but stalls
If I try to restart it doesn't want to budge but if left for a while it will start again but in the same cycle.
 
I'm REALLY confused now!

When you say "try to restart, it doesn't want to budge", are you meaning that it won't crank (turn) with the electric starter?

If so, what about trying to pull it over by hand when it's like that?
 
Hi jgmo
Sorry very poor grammar on my part!! I should have simply said it won't restart ..it cranks over perfectly via the key but even with multiple tries it isn't interested in running after the first time. However if I leave it for an hour or so ..it starts first touch but back to the same scenario .. runs for 15 or 30 seconds then starts to drop in revs and then stalls. Again if I turn the key off and back on it cranks fine but will not fire. Does that sound like the SE valve is causing the motor to become over rich?

Chris
 
No, it sounds more like it's starving for fuel to me. Is the fuel tank vent open? Have you tried pumping the primer bulb to see if you can keep it running?

If the tank is vented and the pump is delivering fuel, my first suspect is that the little tunnels in the bottom of the float chamber are plugged.

If you didn't "Roto-Rooter" them out before with stiff wire, I suspect that the enrichment valve circuit is using up the fuel in the well and it can't get refilled fast enough to keep the engine running.

It dies and then it sits awhile and the well slowly fills back up because there's a partial plug in the tunnel.

That's where I would start looking.


Those tunnels CANNOT be completely cleaned out with soft wire or trimmer string.
I have found a surprising amount of "mud" stuck in those tunnels.

It's either something like that or the float valve is sticking for some reason.

My best guesses from these many thousands of miles away.
 
Thanks for that!!! Yep I would guess that those tunnels are partially clogged. I did try your trick of squirting carb cleaner into the float chamber drain tube and left it overnight ... when it dies the fuel line bulb is hard which should mean the float chamber is full but if the passages are blocked the motor will die. I suspected the SE valve only because the motor starts strongly and then slowly starts to splutter so I'll check the needle side of that after confirming that 12v is coming thru!
 
Hi Guys
Sorry about those who are fighting with 20D carbs!! I have exhausted my supply of carb cleaner so I was about to try and clean the tiny passages under the float chamber with all your suggestions when my neighbour came over and said "The only way to clear those passages is with an ultrasonic cleaner" NOW he tells me ..he is bringing his cleaner over tomorrow (we are on the same jetty) so I'll let you know the progress. Sounds like the purchase of an ultrasonic cleaner is an investment for future issues!!! Update after the weekend!!!
 
OK so far so good
I have done two cleaning cycles of 10 minutes with the cleaner temp at 40 -50 degrees C The first two were done with diluted CLR with water with a 4:1 ratio (that's 4 parts water and 1 part CLR of course. My "neighbour" says for normal cleaning on his little 3.5hp motor he uses cleaning vinegar diluted with water and does it whenever the motor has been sitting for more than 3 months (or sometimes he will give it a clean earlier!
Do you use an ultrasonic cleaner JGMO and if so what liquid do you find works best??? I couldn't shake the carb to get the main jet assy out initially but after just 5 minutes in the cleaner it just fell out!! Impressed!! The CLR/Water setup is quite clean at startup but after 10 minutes is goes quite murky and has bits of foam floating up to the surface!!
 
Chris, on my 2013 Honda CRV, there was a TSB for clearing clogged heater cores- Honda provided dealers with a pump, bucket for pump, and a CLR recipe for clearing the cores. I guess Honda’s respond to CLR.
 
Spent some time with the tech at Honda Marine locally and it seems that you cannot get the older fancy o-ring that seals the float chamber cover. The sales manager looked up my details and saw I bought a carb from them in 2004 so he offered me a brand new one for $199 so I decided to rather put a new one on the motor than try and repair the o-ring split with contact adhesive which would most probably be dissolved by the fuel in the float chamber. plus of course the other gaskets I needed. I will keep the current carb as a spare parts piece if I ever need it as has been ultrasonic cleaned 5 times!!! The channels MUST be clean now!! Thanks to everyone for you kind help!! (PS: my jetty mate gives his Mercury carb a good ultrasonic clean on a regular basis ...plus change the fuel on a regular basis!!!
 
Hi JGMO
With it's 2nd new carb my 20 went thru a tough initiation yesterday moving a 10m houseboat that had engine issues (Yamaha!) Performed very well but I was noticing that although it starts on first touch from cold it did stall (but restarted again by me) as the auto choke when thru it's paces. The idle seems to be very low once up to temperature so would it be worth giving the idle screw a 1/4 turn to keep the idle a wee bit higher??? Otherwise all happy with the new carb!!!

Chris
 
Have you adjusted your valves? On my FI Honda, that improved the idle.

I would also run a dose of something like sea foam through the fuel system. This will clean your valves, works best when engine run under load at higher rpm.

I’ll let others advise you on the idle screw adjustment.

Don
 
Hi. First post so I don’t know if I should be joining this chat or starting a new one. Please put me straight. I have been cleaning my BF20D carb. But I can’t remove the main emulsion tube and the slow jet emulsion tube. It looks and feels like the tube they sit inside is pressed into the carb body. But they do appear as separate parts in the diagram. Can anyone clear up for me whether I can remove and replace these items? Also I attach a photo of the end of the slow jet emulsion tube. Is that a deliberate slot in the tube or a crack? All help gratefully received.
IMG_3782.jpeg
IMG_3778.jpeg
IMG_3779.jpeg
 
Hi,
DId you remove the plug that holds the emulsion tubes up?

Your question confuses me because I don't see how you could have taken a photo of the slow jet (jet set) tube laying down if you couldn't remove it. That tube is pretty notorius for cracking and, yes, I think the one in the photo is definetly cracked.

That tube will crack if the plug is overtightened when installing the set. Any chance that you accidentally did that?
I have also seen the tube cracked when first disassembling the carb so it's possible that it cracked from vibration.

The small oring at the top of the jet set tube is highly critical to the tube's function. It look like the oring in your photo is "wiped out" (veey worn out).

The upper end of the slow jet (jet set) tube should be pushed up into the slow air passage at the top of the carb throat. A new, lubricated oring on the end should sort of "pop" into the hole and leave the tube dangling there until the main emulsion tube is slid over it and the plug is installed to keep both tubes securely held in place.Do not oveetighten the plug!

At a minimum, you will need a new jet set tube and oring. Item 18 in the link is both together
They come as a set in the package.

Handle and install that oring with great care. Use a lube like Vaseline on the oring prior to pushing the tube into place.


Good luck.
 
Hi. Thank you for your reply.

Yes I removed the plug. I can slide the slow jet partly out. Then the shoulder at the other end (to the right of the O ring in the other photo) bumps into the brass fitting which is at the bottom of the carb throat when it is the right way up. That fitting looks v tight and shows no sign of moving. The slow jet wont go past it.

Thanks for the advice re the cracked tube and O ring. I will get new ones if I can work out how to get the old tube out. I don’t think I over tightened the plug. The slot in the screw has been pretty mashed up by a mechanic somewhere along the way so it could have happened at the same time.

The problem I am trying to solve is bogging down in the mid range. Could the crack and dodgy O ring be the cause? I have cleaned the carb in an ultrasonic bath but the central tube/fitting shows no sign of moving. Maybe I should try some penetrating oil before the next extraction attempt??

Thanks again. Really appreciate it.
 
Hi,
It can be very difficult getting this model carb "straigtened out" after it's been allowed to get "plugged up" or worse, mishandled or abused. These particular carbs are finicky and a bit delicate because, for the most part, they are pretty precice about how they deliver fuel.

Your statement about the "boogered up" emulsion plug made me wince thinking about how it was previously treated.

Having said that, I will say that I've had 100% success bringing these back to life but there's always the chance I might not in the future.

The "brass fitting" you say is "very tight" is not removable and should jut out from the left side of the carb throat when peering into the carb from the front when it' being held upright or in the mounted position.
That "fitting" is actually the accelerator pump delivery tube and it houses the orifice that sprays enrichment fuel to the rear of the carb. You can see that orifice if you open the throttle plate all the way and look into the engine end of the carb with good light. Part of a proper cleaning involves making sure that tube is clear and the orifice will shoot an 8 foot stream of carb spray out of the rear of the carb. If it won't do that, the engine is likely never going to run well.

If this sounds like BS to you, I don't doubt it. I couldn't have believed it either until I learned that's how these are.

I have no explanation about why you say that tube points upward or why the slow jet tube is stuck. I have nevee encountered that before. I suspect someone may have forced a wrong part into that carb for some reason.

Yes, try some PB Blaster to see if it will come out. The jet set being already damaged means you can get "frisky" getting it out. You may need to grip it with pliers and pull it or twist it. More damage won't make any difference since you're not reusing it.

Just do not, in any way, damage the accelerator pump tube! If you do, it will be new carb time and those have doubled in price recently.

If you would rather spend the money on the Honda Marine Carburetion Manual that teaches how to understand and clean these carbs the right way, here's the link:


Look under Support Materials at the bottom of the page.

A wealth of knowledge BUT....
...you have to be willing to read it!

50 bucks + shipping
 
My fault for lack of clarity. The accelerator pump delivery tube is clear and working well. The fitting I meant is the brass sleeve that the slow jet sits inside. The jet will slide until it hits the end of that sleeve (if that’s the right word). But it wont pass through it and the sleeve itself doesn’t budge when I try to push it out. From what you are saying it sounds like it should come out when I push it from inside?
 
Ok, once again I'm confused/not understanding.

I thought you indicated that you can't remove the slow jet tube. Is that wrong? If you can remove it out the bottom, inspect the top of the tube closely looking for the number.55 stamped in it.

In your photo with the red arrow pointing at the sad looking remnants of the oring on the top of the tube, it looks as if the hole diameter at the bottom of the carb throat isn't allowing the tube to slide out. Either because the hole is too small or the tube is too large. Wrong??

There are no removable/replaceable sleeves in the carb body for passing the tube through. Do not try to remove that sleeve as it is probably a permanently installed DNFW (Do Not Futz With) part of the body. It's been awhile and I don't even remember a brass bushing in there.

I just consulted the repair manual too and there's no photo or mention of it. So, trying to remove it could ruin the carb. Don't go there until.we know more. It is always possible that some clever "so and so" has tried a good ol' boy retrofit or "improvement" of their own design. I've been guilty of that meself...
...with not always stellar results

The tube should easily slide.UP through the hole in the bottom of the carb throat and should only meet resistance going through the hole in the top of the throat because of the protrusion of the oring when it is new. A slight bit of force pushing the tube upward should be all that is needed to push the tube, with oring, UP into the hole with a little satisfying "pop" as the oring makes it through. That's why a little dab of Vaseline or shot of WD-40 is necessary for installation.

With that pitiful looking bit of oring thats left on the tube in your photo, the tube should pass through the hole with ease and want to fall back out on it's own if released

That's why I'm wondering if someone "afore ye" has installed a different tube than the one that's supposed to be in there.

Hopefully, you'll find a number stamped on the upper end of the tube. If so, that would be a good piece of info to have.
Try using a small inspection mirror if you can't get the tube out.
 
Ok, once again I'm confused/not understanding.

I thought you indicated that you can't remove the slow jet tube. Is that wrong? If you can remove it out the bottom, inspect the top of the tube closely looking for the number.55 stamped in it.

In your photo with the red arrow pointing at the sad looking remnants of the oring on the top of the tube, it looks as if the hole diameter at the bottom of the carb throat isn't allowing the tube to slide out. Either because the hole is too small or the tube is too large. Wrong??

There are no removable/replaceable sleeves in the carb body for passing the tube through. Do not try to remove that sleeve as it is probably a permanently installed DNFW (Do Not Futz With) part of the body. It's been awhile and I don't even remember a brass bushing in there.

I just consulted the repair manual too and there's no photo or mention of it. So, trying to remove it could ruin the carb. Don't go there until.we know more. It is always possible that some clever "so and so" has tried a good ol' boy retrofit or "improvement" of their own design. I've been guilty of that meself...
...with not always stellar results

The tube should easily slide.UP through the hole in the bottom of the carb throat and should only meet resistance going through the hole in the top of the throat because of the protrusion of the oring when it is new. A slight bit of force pushing the tube upward should be all that is needed to push the tube, with oring, UP into the hole with a little satisfying "pop" as the oring makes it through. That's why a little dab of Vaseline or shot of WD-40 is necessary for installation.

With that pitiful looking bit of oring thats left on the tube in your photo, the tube should pass through the hole with ease and want to fall back out on it's own if released

That's why I'm wondering if someone "afore ye" has installed a different tube than the one that's supposed to be in there.

Hopefully, you'll find a number stamped on the upper end of the tube. If so, that would be a good piece of info to have.
Try using a small inspection mirror if you can't get the tube out.,
 
Back
Top