Logo

Honda BF40A outboard hard to start and only 1 piston is firing.

I wanted to ask you if you had removed the float inlet valves and cleaned the seats but I got tied up at the Doctor's office.

I also didn't see you say that you had verified the SE feed channel in the bottom of the float chamber was completely clear.

One last thing to check are the two float chamber air vents. They don't typically clog but will wreak havoc if they do.
 
Ok, that was messy. I went to the part shop today and got the gaskets, O-Rings, and seals . They did not have the the o-ring for the choke apparatus, and the old one is in bad shape. So, it's on order.

Hey, guess I'm ready for the next step. Reassembly? Oh, you had some questions before reassembly.

Once I get the carbs back on and it's running, I have to check the cooling system. Water quit coming from the telltale when I was working on it (before I removed the carb assembly) Is there any point in trying to flush the cooling system in any way while the carbs are off? I only ask because the intake manifold between the carbs and the engine block gives access to the cooling system route.
 
Well, if you don't know me by now, you'll soon realize how ENTHUSIASTIC I am about cooling system maintenance!

Heck yeah! I would take every opportunity to square that away while it might be a bit easier! 👌

Nothing gives more peace of mind on the water than a fresh oil change and a beautiful pee stream ;>).

I will try and post some pics of the air vents but, with your recent experience with carb throat orifice cleaning, you should be able to easily spot the tiny vent holes in the top of the float chamber dome. One on each side of the main jet fuel feed "tower".:geek:

Again, the straw tip over each pin hole and fluid should erupt from a square looking hole on one side of the carb body doing one and out from behind a dime sized, silver expansion plug on the other side.

Then, backflush each so fluid comes out the holes.
 
One mo thing!
Have you tested the thermo valve? Sorry, I don't know if you have a manual or not. Testing that would be high on the troubleshooting chart for the poor starting issue. It involves connecting 12 volts to the control valve.
 
I don't know how excited you might be about buying more parts and doing more work but the link below shows the requisite items to access for the "full Monty" cooling system flush.


With items 8 (thermostat) and 12 removed, you can really get after it and backflush (there's that word again!) the system.

Although, you would want to have the gear case off so that anything beIng pushed out, the way it came in, has the easiest path to exit.

You would need a new water jacket cover seal, item 13 along with a new thermostat cover gasket, item 11

But I also recommend a new thermostat along with a new sacrificial anode zinc with mounting screw items 4 and 30 while you're in there.

Then there's item 9, the tell tale fitting that screws into the block and the tell tale hose/hose, item 29. The tube should be soft and supple to allow small pieces of debris to pass. They harden over time and have a tendency to catch things rather than letting them through.

The tube connects to item 35, the "water check grommet" or, simply, the fitting in the link below.


Now, doing all that now may be a big ask at this time when, in fact, you may just need to clear the tell tale bypass passage behind the fitting screwed into the block to get the pee stream back.

But I advocate doing this on a "new to you" outboard of this vintage because...
1. It's probably never Ben done

2. It could save you heartache later.

The hardware associated with outboard cooling systems tend to sieze when left undisturbed fir a long time. That little zinc needs to be fresh to help protect the other metals.

Around 70% of all catastrophic engine failures originate in poorly working cooling systems.

Do you have any knowledge about when the last waterpump service was done?

See! I told you I was ENTHUSIASTIC!

But, then, I'm not the one doing the work or spending the bucks!

Just some thoughts.

 
Ok,

I was wrong about the vents....got yours mixed up with an older model 40.

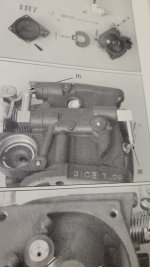
The photo on the left shows the vents, labled 1 and 2

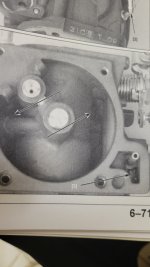
The one on the right shows the internal vent holes, labled 1, 2, and 3.(got that wrong too).
 

Attachments

  • 20240625_002528.jpg
    20240625_002528.jpg
    505.9 KB · Views: 66
  • 20240625_002623.jpg
    20240625_002623.jpg
    394.9 KB · Views: 79
Hi jgmo,

Good news! I got the carbs back together and reconnected to the engine. One turn of the key, and it popped right off (though hard to tell since it it so quiet :)

Next step is likely water pump replacement. I checked for clogs wherever I could stick a piece of weed-eater cord into the cooling system. And I ran the hose through the "wash" opening in the lower unit. But, still no water coming from the tell-tale. I hope a new water pump is all that is needed.

Again, thanks for all your help!

Mark010
 
Yeah BUDDY!

I gotta admit.....I was wondering why I hadn't heard from you yet. I was hoping that you weren't having problems.

So....GOOD NEWS!

Yeah, you will probably find that the waterpump isn't in the best condition.

It's more money but I recommend that you buy the complete pump kit instead of just replacing the impeller.

If you look at everything....pump housing, liner and even the little drive key....very carefully, with a critical eye, I think you'll see what I mean.

Don't forget though, the best time to "downflush" the system is when the pump is off.

Good luck and thanks for the update!
 
I took off the lower unit to replace the water pump. Now I've realized I should have put it in reverse before I removed the lower unit. Is this going to be a problem when I put it back together?
 
No, it's not a big deal.
The reason they say to keep it in reverse is to allow easier access to the shift rod adjustment and jamb nuts.

If you want or need to put it in reverse while it's apart, just push down on the lower shift rod while slowly rotating the propeller shaft....it doesn't matter which direction you rotate but it needs to be moving as you shift so that the dog clutch doesn't bind up on itself.

You might need to use pliers to grab the shaft to do that. I use Vice-Grip pliers to make it easier.

Good luck.
 
Hi jgmo,
Success! The lower unit (with many new parts ) is back on the motor , and it started right up. On top of that, there was a strong stream of water coming out of the telltale.

Thank you so much for all your help. I appreciated your patience and knowledge.

Best wishes . Time for me to get out on the water 😄.

Mark010
 
Yippee!

You have truly impressed me with your ability to jump in and git 'er done!

Honored to be involved with your success!

But, you sir, did all the work!

Happy independence day!!

God bless America!🇺🇲
 
Great post
I’m struggling with the same issue
I didn’t want to break the caps off the air mixture screws
I only cleaned the carb and center low idle jets but missed the others you are discussing.
It only ran on 2 cylinders after my poor workmanship so back on the bench.
Those Tiny holes are microscopic to seniors
 
Next, put the straw in the slow air jet hole (lower one) and plug the jet set tube hole with your finger. While observing the idle orifice....the tiny hole closest to the engine....give it a good spray and ensure a good amount of fluid sprays from the idle orifice. That indicates the passage is clear. But I then like to cover the orifice with the straw tip, plug the jetset tube hole and backflush again. You want to see fluid coming from the low speed air jet passage when doing that. If so, the passage is completely clean.

Now put the straw in the main air jet passage, plug the jet set hole and spray in there.
You should now see fluid coming from pretty much every one of those tiny holes at the rear of the carb throat....including the idle orifice.
If so, the passages are likely clean but I like to cover each orifice with the straw tip and give them one more shot to be sure.
 
I find that downloading a picture here requires that it be downsized quite a bit. 40% of original seems to work best.
 
Update on the carb cleaning
I spent hours on the carbs and it was my second attempt to do it correctly.
First go the motor would only start after pumping throttle and it ran on 2 cylinders
After looking at the jet set with a magnifier I did find cracks as described in other posts.
I did miss the small holes around the butterfly valve on the first go and a previous post helped on that procedure.
I soaked the carb body in hot water and simple green and all jets in aceton then used my air compressor to blow all the holes out so that may have helped
It started but did need to be cranked so I hope the auto enriched is working.
I had a motorcycle with that set up and never got a good cold start So went to a manual choke
On my previous 2002 bf 50 I had water and oil mixing issue and damaged the block when trying to get head bolts out.
I now believe after working on these motors that the carb manifold gasket may have leaked the water into the oil so be very aware of that gasket and replace it
My next project is to remove my 2002 bf 50 from the boat and put the 2006 bf40 a on.
My question is will the control side mount for the 50 that has a green plug work with the newer white plug ?
Any tips
Thanks for all the help
 
Back
Top